
Many crafters use Cricut Maker and Cricut Explore series machines to create rhinestone templates, a lesser-known but powerful feature. Magic Flock is a specialized rhinestone template material that allows you to transfer and adhere rhinestones easily. This material is known as flock or hotfix, and it is pressed onto your garment or fabric with a heat press.
Get ready with your Cricut machine that can cut the rhinestone template material, especially in the Maker and Explore series. Whether you’re preparing for a custom project or looking forward to expanding your crafting skills, this guide will teach you ‘How to create rhinestone template with Cricut Machine’, with full step-by-step instructions.
Supplies Needed for Your Rhinestone Project
You will need the following supplies and tools for making rhinestone projects:
- Rhinestone font
- Cricut Maker or Explore series machine
- Weeding tool
- Heat press or household iron
- Standard Grip cutting mat
- Rhinestones
- Rhinestone template flock
- Brush or rhinestone applicator tool
- Transfer tape
- Garments or items to apply the rhinestones
How to Create a Rhinestone Template With Cricut?
If you’re planning to create a rhinestone template with your Cricut machine, you must follow a structured approach. Follow this step-by-step guide to get optimal results at every stage.
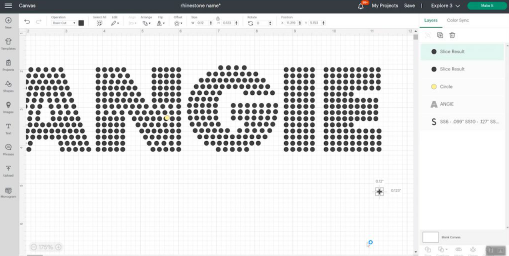
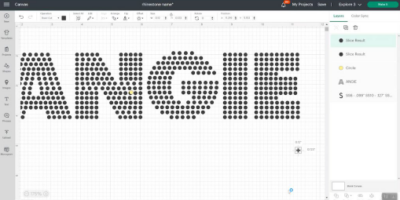
Step 1: Choose or Design Rhinestone Pattern
The Cricut Design Space Software doesn’t currently support rhinestone fills. You have two options:
Option A: Use a Pre-made Design
- Open Design Space and upload your pre-made design image or SVG file.
- Choose the Upload Image option and then Browse.
- Select your SVG file from your system and click Open.
- Insert the design onto the canvas.
Option B: Create Your Own
- Use the Shapes tool to create individual shapes and arrange these shapes in the desired pattern on the design.
- Add a rhinestone grid to your design.
- Adjust the spacing and size of the grid to match the size of your rhinestones.
- Place the design on the top of the grid.
Step 2: Resize Your Design
- Resize the font design so each circle has a diameter of 0.127 inches. Once this is achieved, you’re ready to proceed.
- Verify that each circle is correctly sized.
- Ensure all circle layers are set to Cut.
- Use Attach to keep everything in place during cutting.
- If you want the design to act as a template, you can use the Slice feature to cut the design from the rhinestone grid. You can use the Weld feature for the individual rhinestone shapes to create a single shape for cutting.
 https://cricut-cut.com/wp-content/uploads/2026/03/image-13-300x151.png 300w, https://cricut-cut.com/wp-content/uploads/2026/03/image-13-400x200.png 400w" width="509" />
Note: Remember to mirror your design, especially when it contains text, to ensure proper orientation after pressing.
Step 3: Set Material Settings
- Tap on Browse All Materials and go to Material Settings.
- Click “Add New Material” and locate the green tab at the bottom of the screen.
- Name it as Rhinestone Flock, and then click Save.
- Select “More Pressure” and select the box to apply to all mats.
- Return to the cut screen.
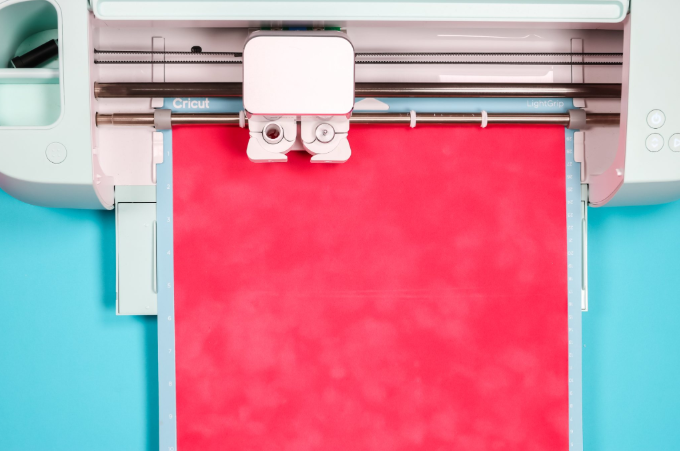
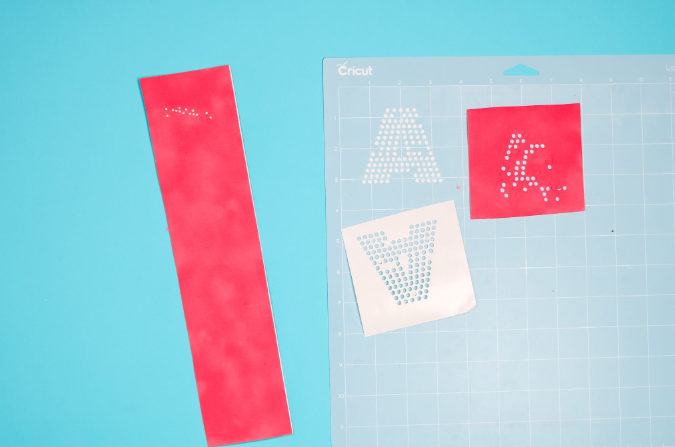
Step 4: Cut the Rhinestone Template
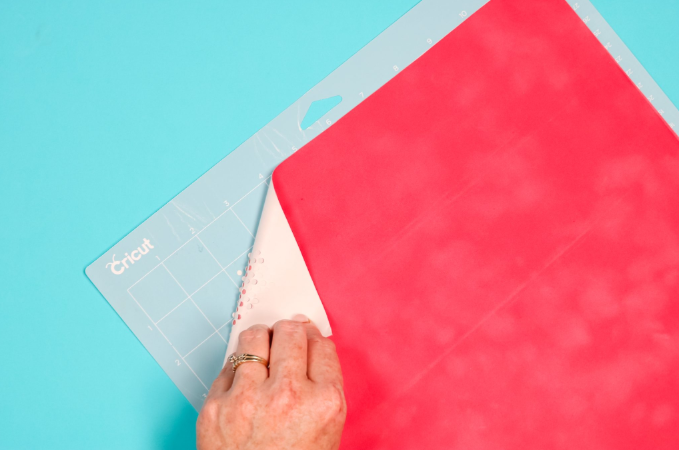
- Now, place the flocked template material on a StandardGrip mat (sticky side down).
- Use a brayer tool to press the material onto the mat.
 https://cricut-cut.com/wp-content/uploads/2026/03/image-12-300x199.png 300w" width="680" />
- After that, click Go to begin cutting.
- If you select “Felt” as your material setting in Cricut Design Space, the mat may become cluttered with debris, as shown in the image.
 https://cricut-cut.com/wp-content/uploads/2026/03/image-11-300x199.png 300w" width="675" />
- Try selecting the flocked paper setting with less pressure. This will allow you to move the mat easily without making a mess.
 https://cricut-cut.com/wp-content/uploads/2026/03/image-10-300x199.png 300w" width="679" />
- Consider using a double-cut setting to ensure a complete cut, especially for detailed designs.
- When you’re done with cutting, weed out all the tiny circles. This will leave behind holes where the rhinestone will sit.
Tip: If necessary, gently use a weeder or tweezers to remove any stubborn holes.
Step 5: Apply Rhinestones to Template
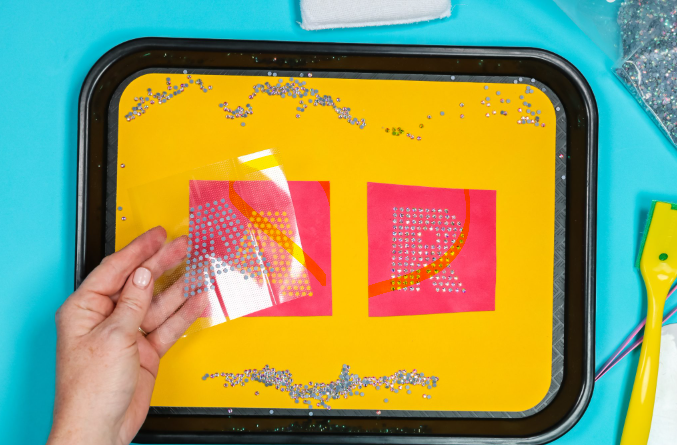
- Place your template and stick it to a clean, flat surface like a tray.
- Pour rhinestones all over the tray.
- Then, brush the rhinestones until the holes are completely filled. If the sizes of your holes are just right, the rhinestone will stick into the right place.
- Shake off the excess rhinestones.
Step 6: Transfer the Rhinestone Design
- Cut a piece of rhinestone transfer tape (make sure it’s heat-resistant).
- Then, gently press the transfer tape over the design, pressing firmly to pick them up.
- Peel off the tape slowly, ensuring all stones are picked up properly.
Note: This transfer tape is different from what we use for adhesive vinyl.
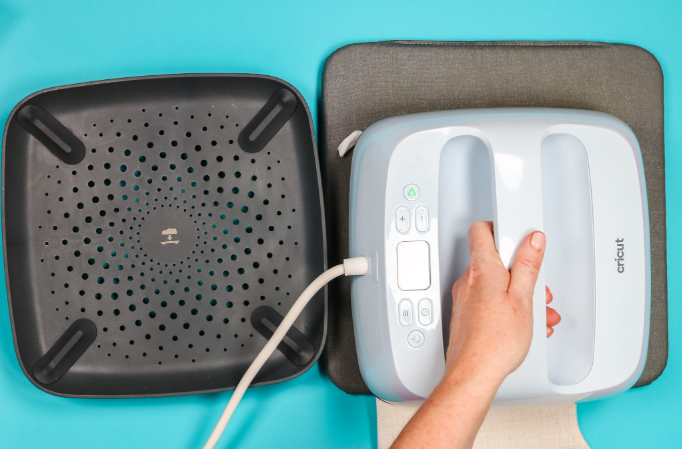
Step 7: Heat Press Your Design
- Wash and iron your fabric. Make sure it is clean and wrinkle-free.
- Place the tape with rhinestones on your garment or surface.
- Press for 15-20 seconds using firm pressure.
 https://cricut-cut.com/wp-content/uploads/2026/03/image-7-300x198.png 300w" width="682" />
- Peel the transfer tape while it’s warm.
 https://cricut-cut.com/wp-content/uploads/2026/03/image-6-300x198.png 300w" width="682" />
- Press the heat press again if you see that the rhinestones didn’t stick in place
- While the process involves a few technical steps, it can be done easily with the right tools and guidance.
And that’s it; your project is ready, and you’ve successfully learned how to create rhinestone template with Cricut!
How to Make Your Rhinestones Last Longer
By considering these factors and following best practices, ensure that the rhinestone embellishments on Cricut projects are durable and long-lasting.
- Use high-quality rhinestones: Opt for rhinestones that are well-made and resistant to fading or chipping.
- Choose the right adhesive: Select an adhesive that is compatible with the material you are applying the rhinestones to, whether it’s heat-transfer vinyl or another surface.
- Apply the rhinestones properly: Apply hotfix rhinestones or use a suitable glue and allow adequate curing time.
- Store projects appropriately: Avoid exposing your projects directly to sunlight or harsh chemicals that could damage the rhinestones.
Frequently Asked Questions (FAQs)
What is the strongest rhinestone glue?
For the strongest bond on rhinestones, you can use E6000 Plus or Bob Smith Industries 2-part epoxy. These epoxy products are known for their industrial strength and durability. They are also water-resistant and suitable for various surfaces, such as fabric and hard surfaces.
However, you should be careful while using it, as it contains solvents that may damage acrylic or resin rhinestones. Therefore, it should always be used with glass rhinestones.
How long do rhinestones last?
The longevity of rhinestones depends on their quality and how they are attached. Lower-quality rhinestones are more prone to fading or chipping. Using a good adhesive or proper curing with gel can surely increase the lifespan of rhinestones, especially in nail art.
For clothing, using Cricut iron-on materials that are guaranteed to withstand up to 50 washes can help ensure the rhinestones stay adhered to the fabric. Exposure to sunlight or harsh chemicals can also make your rhinestones fade over time.
How can I create a rhinestone template using a Cricut machine?
Creating a rhinestone template with a Cricut is easier than it sounds. Start by designing or uploading your artwork into Cricut Design Space. Convert the design into a series of small circles that match the size of your rhinestones (commonly SS10 or SS20). You can use scatter or fill tools to evenly distribute the circles across your design. Once ready, mirror the design if needed and cut it onto a stencil material like flock template material using your Cricut machine. After cutting, weed out the circles to create holes where rhinestones will be placed. Secure the template on a flat surface, brush rhinestones into the holes, and use transfer tape to lift and position them onto your fabric. Finally, heat press the design to set the rhinestones permanently.

You need to be a member of The Word of God Holistic Wellness Institute to add comments!
Join The Word of God Holistic Wellness Institute